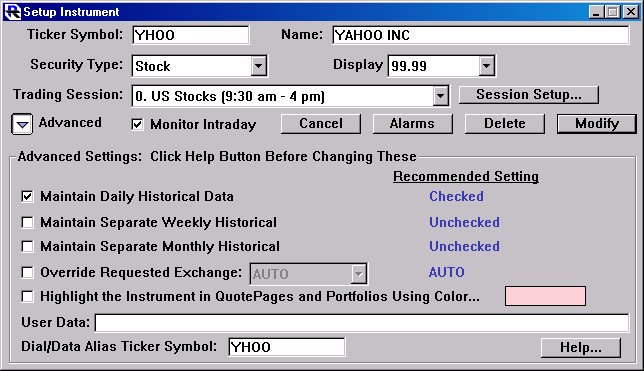
Today's tip will show you how to create a quotepage format that will allow you to quickly check the setup properties for all instruments in your quotepage by adding them as quotepage columns. The Setup Properties are the properties that can be found in the Setup Instruments window (Setup:Instruments) as seen below. It will then show you how to edit those properties directly from the quotepage. Then it will show you how to do a bulk edit of the following properties using a scan:
- Display Format
- Security Type
- Monitoring Options (Intraday, Daily, Weekly, Monthly)
- Session
- Exchange
- Highlight Color
- User Data

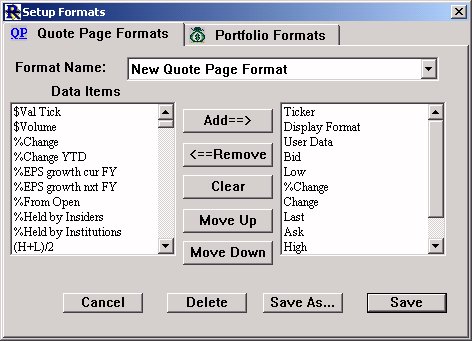
Let's begin by opening your favorite quotepage. Let's save the current format of the quotepage so that we may return to it later. To save the quotepage format, Shift-Click on the "Change Format" button  (10th down on the right) in the quotepage toolbar. This should open the "Setup Formats" window with your quotepage columns already filled in. Click on the Save button and give it a name such as "My QP Format". Now we can come back to this format in the future.

Let's now create our Instrument Setup Format. This format is going to include many of the important properties that can be found in the Setup Instrument window. First, let's remove all the current columns from the quotepage except for the "Ticker" column. To remove a column, either right-click (control-click on Mac) on the column heading and choose "Delete column", or just drag and drop the column heading off the top of the quotepage window.
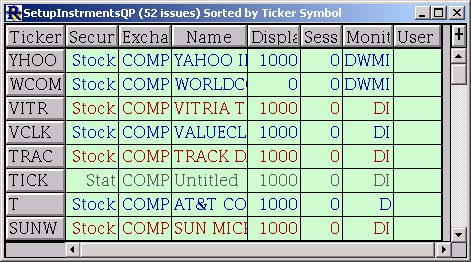
Now let's add our Instrument Setup columns to the quotepage. Click on the "Add a new data column" button in the quotepage toolbar. Now click on the data column "Security Type". You will note that the data columns are listed in alphabetic order, and by simply hitting the first letter of the item you are looking for, in this case "S", the window will scroll directly to the first item that starts with an "S". Once you have "Security Type" selected, you may click the apply button to add the column to your quotepage. Now, let's repeat this procedure with the following columns: Exchange Requested, Name, Display Format, Session, Monitor, and User Data.

You may now rearrange these columns into the order that you prefer. To move a column, simply drag it from its current position and drop it between two other columns. Once you are happy with the format of the quotepage, save the format. Again, shift-click on the "Change Format" button in the quotepage toolbar. Then, click on the "Save" button. Let's call this format "Instrument Setup".
Now, let's go back to our quotepage and discuss ways we can edit these data columns. Let's begin with the "Exchange Requested" column. The "Requested Exchange" property of an instrument allows you to "filter out" incoming trades for an instrument that do not match a specific exchange. For example, if you setup a Stock instrument and specify NYSE as the requested exchange, only trades that occur on the NYSE will be considered for this instrument. Incoming trades from the data service that specify any other exchange will be ignored. If you specify COMP (composite) as the requested exchange, all incoming trades regardless of exchange are processed for the instrument. In most cases, this column should display "COMP" for composite. If you want to see the exchange identifier of the most recently received trade in your quote page, add the data column "Exchange of Trade" to your quote page format.
If you would like to modify the "Requested Exchange" column directly from the quotepage, simply modify the text and hit "Enter". For instance, if the exchange shows "AMEX" and you would like to change it to "COMP", simply highlight "AMEX", type in "COMP", and hit "Enter". A box will come up asking whether you would like to modify the existing instrument or add this as a new one. You should choose to "Modify".
The name field may similarly be edited directly. Certain data feeds broadcast the name and fill in this field automatically. If you notice that you modified the name slightly, and yet your changes disappeared shortly after, this is probably just a matter of the data feed overwriting your changes.
The value you see in the "Display Format" column in a quotepage and the "Display Format" field of the "Setup Instruments" window are defined below…
| Setup Instruments | QuotePage Column | Definition |
| 99 | 1 | Nearest Whole Number |
| 99.9 | 10 | Decimal - Nearest 10th |
| 99.99 | 100 | Decimal - Nearest 100th |
| 99.999 | 1,000 | Decimal - Nearest 1,000th |
| 99.9999 | 10,000 | Decimal - Nearest 10,000th |
| 99.99999 | 100,000 | Decimal - Nearest 100,000th |
| Fraction | 0 | Show Nearest Fraction |
| 4ths | 4 | Decimal - Nearest 0.25 |
| 8ths | 8 | Fraction - Nearest 1/8 |
| 16ths | 16 | Fraction - Nearest 1/16 |
| 32nds | 32 | Fraction - Nearest 1/32 |
| 64ths | 64 | Fraction - Nearest 1/64 |
| 128ths | 128 | Fraction - Nearest 1/128 |
To edit the value of the "Display Format" column in a quotepage, simply change the number. For instance, if you would like to change the format from 16ths to 32nds, simply change the 16 to a 32.
Each session has a number associated with it, as can be seen in "Setup: Preferences: Sessions". The value seen in the "Session" column of the quotepage depicts this number. To change the session directly from the quotepage, simply change this number to the number of the session you desire. Again you will be asked if you wish to create a new instrument of Modify the existing one. Click "Modify".
The "Monitor" quotepage column represents the data retention settings for that particular instrument. Each instrument can be set to retain data for any of the following periods: Intraday, Daily, Weekly, and Monthly. In the quotepage column, these four retention periods are abbreviated with their first initial. For instance, if your instrument is setup to retain data for daily only, you will see a "D" in this column. If you would like to modify this instrument to add Intraday data collection in addition to Daily, you would simply place an "I" after the "D". Now the column should read "DI", representing that both Daily and Intraday data retention options are turned on for that instrument.
To specify the default settings for the properties we discussed above, go to "Setup: Preferences: Instruments". What you type in a brand new ticker symbol into a quote page row, Investor/RT will create a new instrument automatically using these default settings.
Finally, the "User Data" column shows a 24 character text field that can hold any user text you may wish to put there. User Data, for example, could contain a notation such as "buy at 100" or it could contain codes of some kind to indicate the industry group or sector or risk level of the instrument. The scan language can then be used to find instrument with certain text contents in the User Data field for the instrument. In addition, chart annotations can display the "%USERDATA" text on the chart so that as instruments are charted, their user data notations appear automatically in the chart window. The user data text for an instrument can be edited by simply clicking in the cell and editing the text.
Bulk Editing with a Scan After the above discussion, you may realize that you have one property that you would like to change for all the symbols in Investor/RT. This can be done rather easily using a scan.
Display Format
You can change the display format using any of the following scans:
change format to "99.99"...
SET(DISP, 100)
change format to "99.999"...
SET(DISP, 1000)
change format to 8ths...
SET(DISP, 8)
change format to 1/32nds...
SET(DISP, 32)
You can run one of these scans on your ".All Symbols" quotepage. Or you could apply it to some user-defined quotepage if you want to limit the changes to that subset of instruments.
Security Type
Similarly, if you would like to set the security type of all the symbols in a quotepage to "Stock", you would run the following scan…
SET(SECTYPE, 1)
The "1" represents Stocks. Numeric codes for each security type follow:
| Security Type | Numeric Code |
| Unknown | 0 |
| Stock | 1 |
| Stock Option | 2 |
| Future | 3 |
| Spread | 4 |
| Future Option | 5 |
| Spot | 6 |
| Corp Bond | 7 |
| Govt Bond | 8 |
| Muni Bond | 9 |
| Fund | 10 |
| Stat | 11 |
| Index | 12 |
| Forex | 13 |
| Cash | 14 |
| Garvin Bond | 15 |
| User Defined | 16 |
| Feed Calculated | 17 |
Monitoring Options
You can similarly set the monitoring options on and off for an entire quotepage. If you would like to turn Intraday monitoring for all instruments in a specific quotepage, you would run the following scan…
SET(MON, MON_INTRA)
…on the desired quotepage. Similarly, if you would like to turn off intraday tracking for all instruments, you would place a minus sign in the scan such as this…
SET(MON, -MON_INTRA)
The scan works similarly for Daily, Weekly, and Monthly options, replacing MON_INTRA with the following constants: MON_DAILY, MON_WEEKLY, and MON_MONTHLY.
Session
To change the Session of an instrument, using the following scan:
SET(SESSION, 31)
This particular scan will set the session of all the instruments in the quotepage to session number 31. To see a list of the sessions and their corresponding numbers go to "Setup: Prefs: Sessions".
Exchange
The default is the AUTO (automatic means any exchange). This is the recommended setting, and this should rarely be changed. AUTO is sufficient 99.9% of the time. However, some data feeds require special exchange settings to receive Canadian Stock quotes, for example. If for some reason you have to provide an exchange code other than AUTO, you can do so by editing the "Requested Exchange" data column in a quote page containing the instrument(s) in question. You can also check the "Override Exchange" checkbox in the Instrument Setup window and then select another exchange there. Lastly, you can run a scan that sets all the instruments in a quotepage to the same exchange.
SET(EXCHR, 1)
The scan above would set the exchange of all instruments to "AUTO". To set to any other exchange, simply view the order that the desired exchange appears in the list of exchanges in the Setup Instrument window, and set the EXCHR to this number (AUTO corresponding to 1).
Highlight Color
A new RTL token COLOR can be used to test or set the highlight color of instruments. A few "constant" tokens have also been added to facilitate setting highlight color. For example, the scan:
SET(COLOR, COLOR_LTBLUE)
will set the highlight color of all instruments in the source quote page to light blue. Setting the COLOR token to zero for an instrument turns off highlighting for the instrument. Setting the highlight color to a non-zero value not only sets the color but also turns on highlighting. Thus,
SET(COLOR, 0)
turns off highlighting for all symbols
SET(COLOR, (CH > 5)*COLOR_PINK)
highlights (in pink) all instruments with net change in price of $5 or higher, and turns off highlighting for all other instruments. NOTE: the express (CH > 5) evaluates as zero if the express is false and one if the expression is true.
SET(COLOR, (CH > 50) * COLOR_PINK + (CH<=50) * COLOR_LTBLUE)
highlights instruments priced above $50 in pink, those priced at $50 and below in light blue
COLOR can also be used as a scan criterion. For example,
CL > 50 AND COLOR = COLOR_PINK
lists instruments priced above $50 that are also presently highlighted with color pink. Setting COLOR to a value -1 through -256 will set the color to the corresponding color in the standard Investor/RT color pallet that pops up when you click on a color control. For example,
SET(COLOR, -81)
will SET the color of all instruments to color number 81 which happens to be a pastel green color on the Macintosh platform and a green-yellow color on Windows due to differing color palettes in use. Investor/RT uses the RGB (red, green, blue) model internally to represent colors. All colors are represented by (usually large) numbers consisting of a R (red), G (green), and B (blue) component. R, G, and B are numbers between 0 and 255. The color number for any color is then calculated by the formula:
(R * 65536) + (G * 256) + B
Any color in the "24-bit spectrum" can be represented by some combination of R, G, and B in the above formula. For example, a light gray can be obtained by equal values of 200 for R, G and B, as in this example:
SET(COLOR, 200 * 65536 + 200 * 256 + 200)
set all instruments highlight color to light gray The "Highlight Color" data column can be added to a quote page so you can see the actual RGB value assigned, if any, as the highlight color for each instrument. Highlight colors can be set using the color pallet by clicking on the highlight color control in the Setup: Instrument window.
User Data
The User Data field may be "cleared" out or initialized using the following scan:
SET(USERDATA, CLEAR)
