Edit User Variable (RTX)

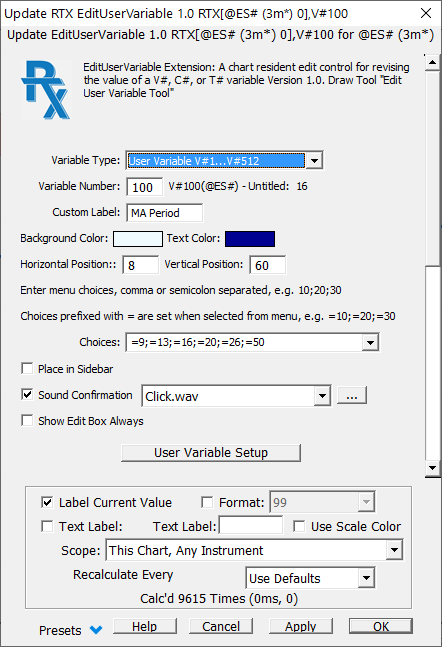
The EditUserVariable RTX Extension is a tool designed to facilitate changing the value of a V#, C#, or T# user variable. Chart buttons, setup with purpose Set V# Variable or Set C# Variable can also be used to accomplish this. If a chart button to set a variable has no specific value, then clicking the button prompts for the value in a dialog box. This works well for occasional changes, but is not convenient for making frequent changes to a user variable. The purpose of the EditUserVariable tool is to provide one or more persistent user variable editors directly in a chart. The editor shows the variable name, its present value, and an entry box for changing the value. Enter a value, press the enter key to apply the change. The entry box offers a menu containing user-specified values or commands. The entry box is used to enter values or it can be used to enter commands that can increment and decrement the value of a variable by some specified amount.

Presentation

Edit User Variable (RTX)

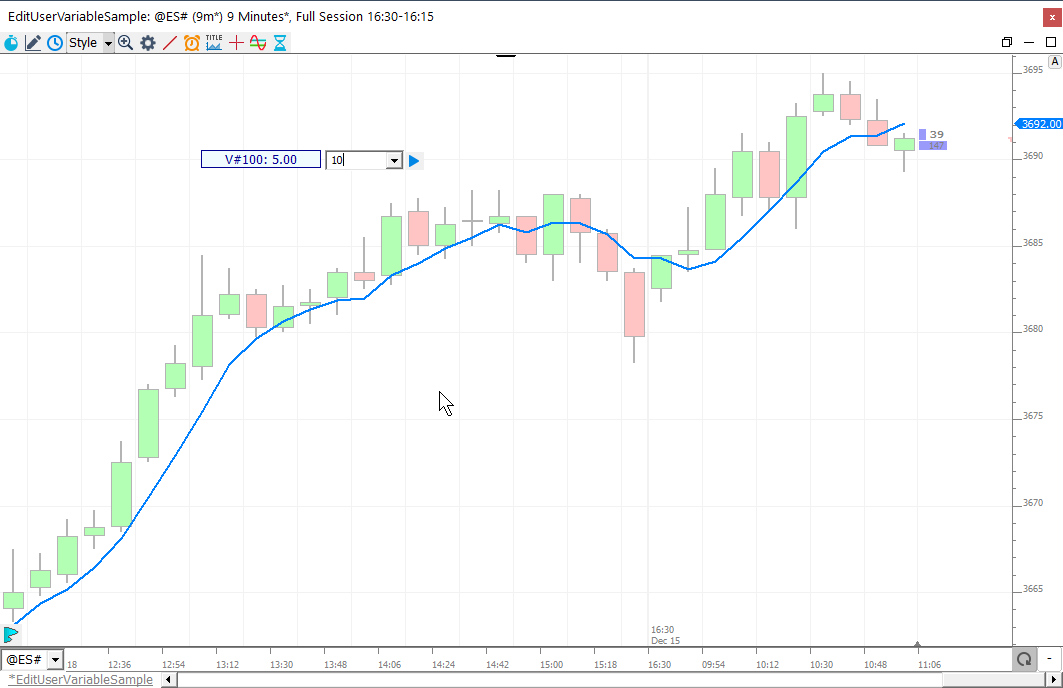
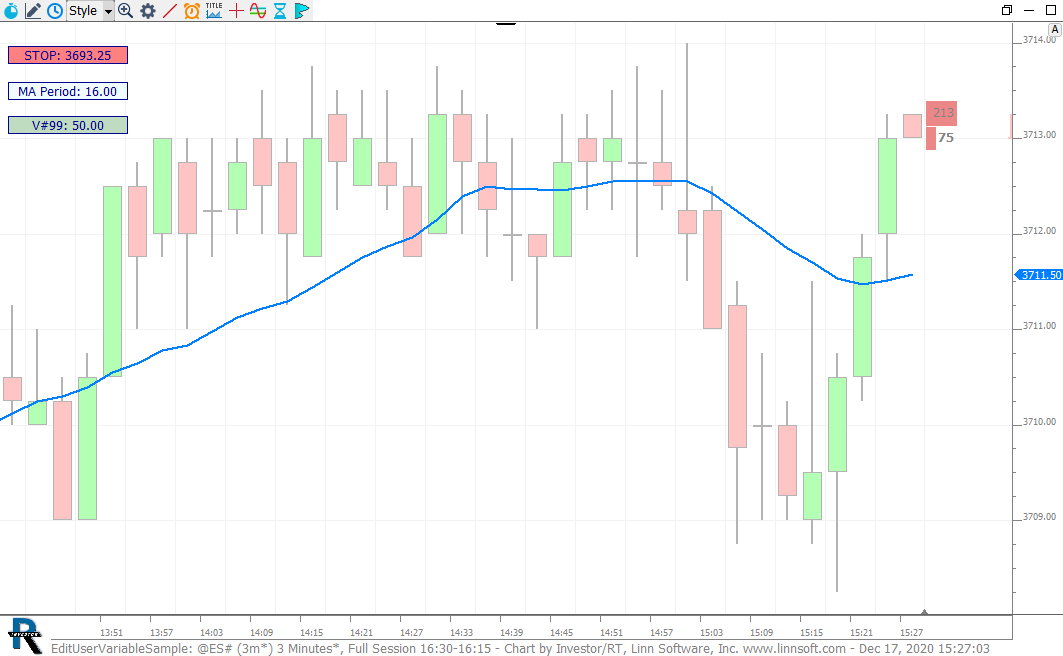
EditUserVariable has three components: a label, an entry control with a menu, and a button, the Go button to apply a value to the subject user variable. The label shows the variable name and its present value. Enter a value, press the enter key to apply the change or click the Go button. The entry control offers a menu containing user-specified values or commands. The edit control is used to enter values or it can be used to enter commands that can increment and decrement the value of a variable by some specified amount.


Keyboard Adjustment

Positioning EditUserVariable in the Chart

  1. Drag and Drop

  2. Drag and Drop the label onto the price scale to create a sidebar for EditUserVariable

  3. Select the RTX and use the keyboard
    a. Arrow keys for fine adjustments up/down/left/right
    b. Shift + Arrow Keys for faster moving adjustments up/down/left/right
    c. Ctrl + Left/Right Arrow keys for moving to/from sidebar
    d. Ctrl + Up/Down Arrow keys for moving to the top/bottom of the pane.

  4. Set a specific horizontal/vertical offset position in the settings.

  • Variable Type:
    Make a selection for a V#, C#, or T# user variable
  • Variable Number:
    Enter the variable's number. The name (and for V#'s the user specified title) will appear to the right as the variable number changes.
  • Custom Label:
    The title that will appear as the label of the variable in the chart. Leave blank and a title will be supplied.
  • Background and Text Color
    Set the text color and background colors to blend appropriately with the background you use in your chart.
  • Horizonal and Vertical Position:
    The offset from the top left corner of the pane where the Label will be positioned. Position can be adjusted by drag and drop or using the keyboard.
  • Menu Choices:
    Choices for the edit control menu, comma or semicolon separated menu items. Choices may be values or commands. Commands pertain only to V# and C# variable editing. Instead of a specific value an operator and an incremental value are provided. Operators are +=, -=, and *=. The command += 0.25 will add 0.25 to the value of the variable each time you click the Go button. Similarly, -=1 will subtract 1 from the value of the indicator. You could use += -1 to decrement by 1 as well. The command *= is used to multiply the value of the variable by some amount, e.g. *= 1.01 will increase the value of the C# or V# variable by 1% while *=0.99 will decrease the value of the variable by 1%. If you leave choices blank some sample choices will be provided. Menu choices that are prefixed with an equal sign, for example, =123;=456 will appear in the menu with the = prefix. When you use the menu and select such an item, the value will be immediately applies to the variable in quesition. With the = prefix, a menu item will populate the edit control and you can then apply the value by pressing the enter key or by  clicking the Go button. The = prefix applies to T# variables, for example, an EditUsesVariable setup for T#1 with choices =BUY;=SELL;=HOLD wil set the T#1 text to BUY, SELL, or HOLD upon menu selection.
  • Check Box - Place in Sidebar
    When checked the RTX will reside in a sidebar pane. EditUserVariable controls can reside in the same sidebar with other RTX extensions such as Clock, FlexMeters, ChartMiniTrader.
  • Check Box - Sound Confirmation
    When checked the user select sound will be played whenever an new value is applied (set) into the subject user variable as audible confirmation.
  • Check Box - Show Edit Box Always
    When checked the three components of the EditUserVariable (Label, Edit Control, Go Button) will always be visible in the chart. Uncheck this box to show only the Label and present value of the subject variable. When you wish to use the edit control, click on the label and the edit controls will appear.
  • Button: User Variable Setup
    Click this button to open the Preferences > User Variables panel in which you can provide titles and display formats for V# variables. Unless a custom label is specified, V# titles will be used in the label instead of the V# number. C# and T# variable do not have user-specified preferred titles; use the Custom Label preference to see a meaningful label, including the variable number if you wish, e.g. "C#1 MA Period".
EditUserVariableSample
EditUserVariable RTX Sample Chart.

Read more Download

Pop-up Video Description View
Edit User Variable (RTX)

The purpose of the EditUserVariable tool is to provide one or more persistent user variable...

 Watch