This indicator provides a flexible, colorful, compact method for displaying multiple markers on a chart. The marker position can be based on the results of either Signals, Custom Indicators, or any user-developed RTX extension.
- For Signals, color options are given for both TRUE and FALSE results.
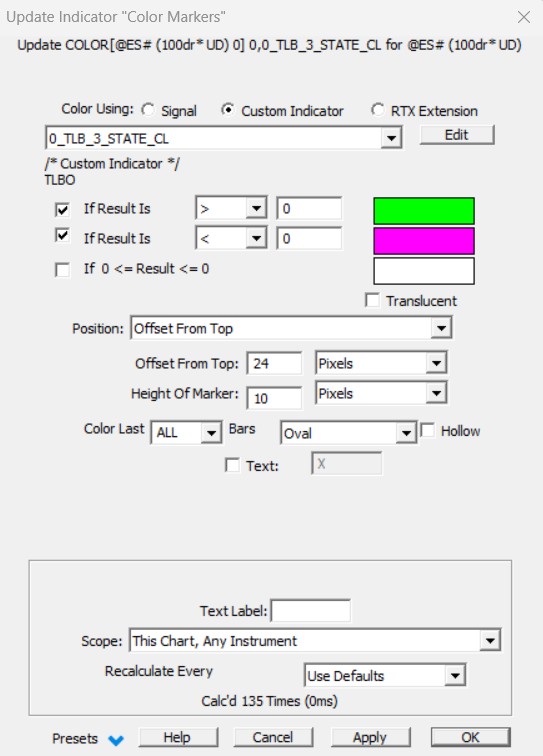
- For Custom Indicators, color options are given for three different user specified price ranges.
Several shape options are currently available, including rectangle, oval and up/down arrows. The color marker for each bar has the same width as the bar. The height and position in the window is user customizable.
Markers can be offset by any distance from the top or bottom of the window pane, or they can span the entire height of the pane ("Top to Bottom" option). If the marker is offset from the top or bottom, it can also be given a user-specified height. Height and offset options can be specified in three units: pixels, % of bar width, or % of window pane height. Color Markers can be dragged between window panes, maintaining their relative position in the pane.
For the record, please note that the most recent PaintIndicator RTX opens even more flexible marker display options, when set up in a Signal marker configuration (i.e. with the "Shape(Custom)" style), as it offers up to 6 "Paint when" coloring conditions, gradient coloring and variable size marker controled by Custom Indciatros values, Additional text and Labeling features, detached displays options and much more..
Presentation

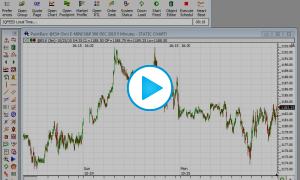
Above is a 5-Minute Chart of Real Networks (RNWK). The Color Marker is added 7 different times. Three times as solid ovals at the top of the upper pane, once as an up arrow at the bottom of the upper pane, and 3 times as rectangles in the lower pane. Below are the settings top marker (rectangle) in the bottom pane. The Preferences
Keyboard Shortcuts
Markers can also be adjusted using the keyboard. To move the markers up or down, select the marker by clicking on it, and then use the up and down arrow keys on your keyboard. To adjust the height of the markers, hold down the shift key while hitting the up and down arrow keys on your keyboard. These shortcut keys make it much easier to tweak your markers to the correct height and positioning. Color Markers give the user the ability to place multiple signal markers into a small amount of space.
Stacking markers
The markers can be stacked at the top or bottom of the instruments window pane, can be stacked in their own window pane, or can each have it's own pane. To stack several markers on top of one another, you would just add them in succession, increasing the offset each time. For instance, you may choose a height of 8 pixels. You could then add your first marker at an offset of 0 pixels from the top. Your next marker would then be added at an offset of 8 pixels from the top, the third at an offset of 16 from the top. This would stack 3 markers on the top of the window pane, each with a height of 8 pixels. You can add as many markers to each window pane as you wish, or you may choose to add only one marker per window pane that is relevant only to the indicator in that pane.