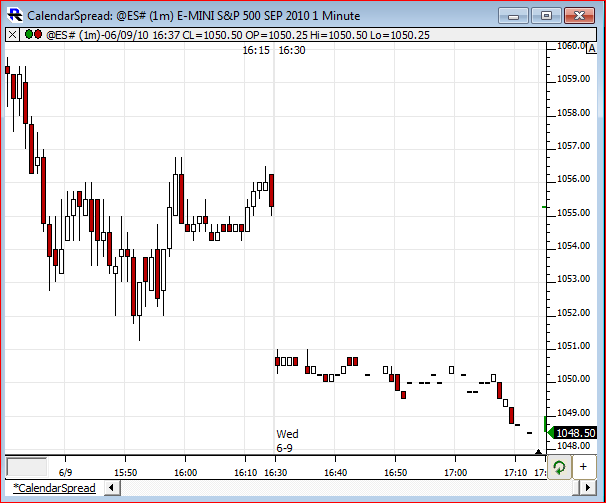
When a futures symbol rolls over to a new contract, a gap is created at the exact time of the rollover.Looking at a specific example, below is a chart of the continuous contract the S&P mini contract (@ES# using DTN IQFeed). This continuous symbols follows one contract right up until the time of rollover, then immediately switches to follow the new front-month contract. This is demonstrated in the chart below showing 30-minute data on 06/09/10, a day when the ES rolled from June 2010 (M0) to September 2010 (U0). Notice the gap right at the open of the new session at 16:30 EST, a drop of 4.50points.
Many traders would prefer to remove this gap, adjusting the data prior to the gap to align with the data of the new contract. This gap removal/adjustment is especially important for users who wish to view longer term volume profiles which span across several months and contracts.
For those using DTN IQFeed to feed Investor/RT, or using DTN Market Access for backfill, DTN now provides a method for supplying pre-adjusted backfill data when downloading. This will result in the tick data, 1-minute data, and daily data being adjusted properly. If you do not use DTN for backfill, see All About Futures Rollovers to learn how to adjust the data manually.
DTN Adjusted Continuous Data This 11 minute video demonstrates how to turn on the auto-adjusted DTN backfill data and answers a number of questions that have been submitted by users on this subject. NOTE: Adjusted data is now turned on by default.
Auto-adjusted backfill data for continuous contracts for those downloading from DTN is now turned on by default in Investor/RT. No action is required by the user. If you would like this turned off instead, perform the following steps:
- From within Investor/RT, choose "File > Open > Configuration File" from the main menu
- Insert this line on a line by itself within the file DTNAdjustedContinuousFutures=FALSE
- Now choose "File > Save > Save" from the main menu
See Also
- Futures Rollover This video covers rollover and adjusted data.
- Maintaining Adjusted Data Thru Rollover In this video you will learn how to best manage and maintain this adjusted data through a rollover period